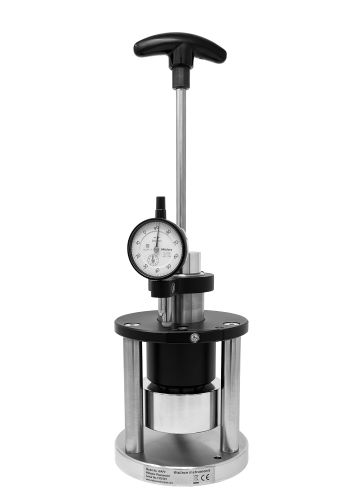
Williams P2 Parallel Plate Plastimeter

Features
- Simple error free operation
- Consistent results assured
- Robust design
- Easy to use
- Measurements to 0.01mm
- Latch allows samples to be safely inserted between plates
To find out more about this product contact Wallace.
Introduction
This apparatus is widely used in the silicone industry and is also used for determining the plasticity and recovery of uncompounded, compounded and reclaimed stocks of unvulcanised rubber. The test consists of compressing a cylindrical sample of specified volume between parallel plates and measuring the compressed height.
The Plastimeter consists of two parallel platens, the lower mounted on the base of the instrument. The upper platen is raised and lowered vertically by a handle.
When the upper platen is lowered, a force of 49 ± 0.O5N is applied to the sample. The upper platen can be locked in the raised position so that the sample can be easily loaded. A dial micrometer gauge reads the thickness of the test sample which is the Plasticity Number.
The sample is prepared from a sheet of unvulcanised rubber about 15 mm thick. When cut with the rotary cutter, the height should be adjusted until the volume is 2.00 ± 0.02 cc. If the density is known, the sample weight can be altered to obtain the correct weight and therefore, volume. Three samples should be prepared for each test. They are lightly dusted with talc and care should be taken to ensure that they are not appreciably deformed before testing.
Refer to the relevant standard. The test is normally carried out, if an oven is used, at 70°C or 100°C. Readings may be taken at any desired interval following the application of the load. The most frequently used intervals are 3 min and 10 min.
Thickness Gauge
For the Recovery test, a separate thickness gauge is required to accurately measure the thickness of the test sample. It should have a presser foot of 25 mm diameter actuated with a dead weight force of 0.8 ± 0.03N. A suitable instrument is available under ref. S.4/13 at extra cost.
Plasticity Test
The test sample is placed between two pieces of suitable material to prevent it sticking to the platens during the test, and to allow for this, the dial gauge of the Plastimeter is set to zero with two pieces of such material between the platens (without the test sample). If an oven is used the sample is then pre-heated at the test temperature for 15 min.
The pre-heated sample is placed between the two pieces of material and inserted between the platens. The upper platen is lowered, and at the end of the required time interval, the height of the sample is recorded in millimetres. (h1)
Plasticity number P = 100h1
Recovery Tests 'A' and 'B'
Two procedures are specified for the Recovery test. For method A, the test sample is removed from the Plastimeter immediately the Plasticity test described above has been carried out. It is allowed to cool for 1 min. and the height (h2) is measured again
The Recovery, Ra = 100 (h2 - h1)
For Method B, the procedure is similar to that for the Plasticity test except that the sample is compressed to a set height of 5 ± 0.01 mm. At the end of the compression period the sample is removed and allowed to recover for 5 min. at the test temperature. The height of the sample (h3) is measured again.
The Recovery, RB = 100 (h3 - S)
Oven
Under ref. P.2/1 the Parallel Plate Plastimeter is available complete with a Wallace Laboratory Chamber designed specifically for the purpose, which is suitable for temperatures up to 150°C.
Reference
For full details of the test and procedure, refer to Specification ASTM D926-93.
Parallel Plate Plastimeter only Ref. P.2
Rotary Specimen Cutter, 16 mm dia. Ref. P.2/10
Bench Thickness Gauge Ref. S.4/13
Product range
| SKU | Name | Add to quote |
|---|---|---|
| WAP2 | Williams Parallel Plate Plastimeter - P2 |


